![]()
|
|
How To GuideHow to do a USHCN, GHCN or GISS weather station site survey Items needed:
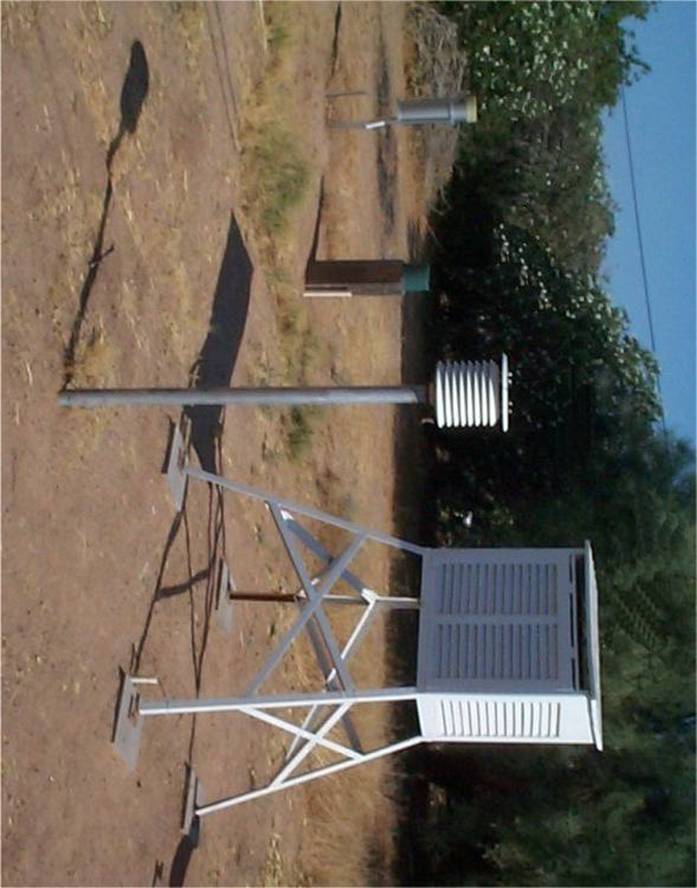
Preparation: Choose a site to survey near you on along your travel route. This can be done by visiting the Database at http://gallery.surfacestations.org/ and looking up what sites are in need of surveying. Find the location of the weather station site to be surveyed in advance. Sites are listed by name, and give an approximate lat/long to the nearest hundredth of a degree, but that likely will be too coarse to locate with a GPS. You’ll need to find out where its located by place name, some web research will likely be needed, though sometimes the name itself is the best clue. Weather stations are often located at some governmental entity, such as an airport, agricultural experiment farm, water or sewage treatment plant, fire station, police station, ranger station, municipal yard, highway department, or school/library. There are some sites that are operated by media such as newspapers, and a few that are at private residences. Often calling ahead can help you locate just exactly where the station might be. Again a web search can help you locate the telephone numbers and email addresses of contacts that may be able to help you. Some stations may be on restricted property, so it’s a good idea to let people know you are coming. At the site: Onsite Photography. Photographs will be the most important record you can make, so don’t hesitate to shoot as many pictures as you want. You can always pick the best ones later to be uploaded to the gallery.surfacestations.org website. There are five most important pictures to get: An overall view that best expresses the character of the site, plus views looking North, South, East, and West. Look for nearby biases. Additionally get pictures that show any nearby structures, trees, roads, or other things that interrupt the flat terrain near the weather station shelter. In some cases, inappropriately placed things such as parking lots, air conditioner fans, metal outbuildings, trash incinerators, pools, or sprinkling systems may be nearby. Be sure to get pictures of these things showing the weather station shelter in the picture also. Measure the distance from the shelter to these things if close by, 25 feet or less. If they are more than 25 feet away, use your best estimate of distance. Make notes in your PDA, notebook, or voice recorder. At the site - continued Get a GPS latitude and longitude fix. Preferred readings are in degrees with decimal points, such as 39.69104 N and 121.82127 W Place your handheld GPS device with a meter of the station and if it has a “marking” function, mark that location and store it in its memory. If the device allows naming the point you marked, give it the name of the site. CAUTION: Some handheld GPS devices don’t reach maximum accuracy until 2-5 minutes after power on, be sure to wait until the manufacturers recommended time or indication of maximum accuracy occurs. If your GPS does not have the ability to record/mark points, then write down the latitude and longitude in your PDA, notebook, or make a voice memo. Later you’ll transcribe the latitude and longitude to the site survey form in your PC. Make notes of site details. Note the type of shelter (Stevenson screen or stacked plate shield). If the shelter is a Stevenson screen note if has been repainted. Look for paint chips or missing paint. If possible get pictures of chipped paint, missing paint, and paint drips or brush marks. If the shelter is a Stevenson screen, if possible, get pictures of the interior and the instruments. Ask the curator/observer about the site history. Sometime the site may have been moved, damaged, or some other event may have interrupted record taking. Here are a few questions to ask that can help: How long has this been operating at this location? Has any of the instruments ever been replaced or repaired? Has the shelter ever been replaced, repaired, or moved in any way? Have you ever repainted the shelter, and if so, what kind of paint? (Latex, enamel, gloss, flat, etc.) (if there is some odd nearby bias, ask this ) How long has the “X” been near the weather station? (if there are parking spaces nearby, ask) Do vehicles get parked near the weather station regularly? (if the curator indicates the site/shelter has been moved, ask) Can you show where it was previously located? Once there get new photos and a GPS fix. It is important to determine what year, and if possible, the month, that the site/shelter was moved and make a note of it.
Fill out the site survey form. Using your word processor, complete the site survey form. Fill in as many details you measured and photographed as possible along with whatever you learned about the site from the curator/observer. A free Microsoft Word compatible word processor is available at http://www.openoffice.org It has the ability to save as PDF natively, see below. IMPORTANT: After completing the form, save it as a PDF file with the site name like this: yoursitename_sitesurvey.pdf If you don’t have the ability to create a PDF document from your word processor, try the free PrimoPDF program or go to Adobe’s free trial online PDF creator website at http://createpdf.adobe.com/ and use the free service. Preparing your pictures for upload to www.surfacestations.org. Sizing pictures If you took to pictures at resolutions greater than 3.1 megapixels (2048x2048) the pictures will be too large to upload. Use any photo editor to reduce their size. If your camera setting was at 3.1 megapixels, 2048 pixels wide or lower then you can skip picture size reduction.
Renaming pictures IMPORTANT: You should rename your pictures to reflect the site name, like this: sitename_overall.jpg sitename_looking_north.jpg sitename_looking_east.jpg sitename_looking_south.jpp sitename_looking_west.jpg Other pictures: sitename_1.jpg sitename_2.jpg ……sitename_x.jpg etc or whatever name suffix you want. The naming is critical, except that you need to include the site name somehow in the picture filename. SUGGESTION: Use underscores like this: Chico_University_Farm_overall.jpg rather than spaces in your filenames, while the space won’t prevent the picture from being uploaded, it will cause a %20 (the code for a space) to be inserted in some web browsers : Chico%20University%20Farm%20overall.jpg when viewing the filename. It’s a small annoyance, but not critical.
Uploading pictures and the site survey form Go to http://gallery.surfacestations.org and register if you have not already done so. You cannot upload your files without registering. Registration is free. After completing the registration for, you’ll be sent an email with a confirmation link to click on, once doing that you’ll be registered. Next, use the website navigation; locate the station that you recently surveyed in the gallery. If you cannot locate the station in the USHCN or GHCN/GISS databases, it may be that a blank placeholder has not been added yet. Contact info@surfacestations.org to have it added if this is the case. If you have been granted “power user” status, you can do an “Add Album” under the appropriate country, state or province to create a blank album for the USHCN or GHCN weather station site you want to upload photos to. Enter the album of the USHCN or GHCN weather station site. It will be blank except for a message saying The Album is empty, add a photo.
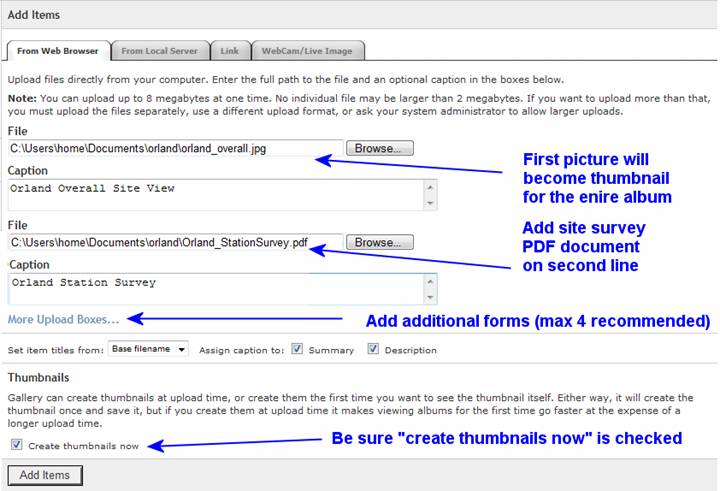
Uploading pictures and the site survey form…continued Click on Add Items on the left side menu or the Add a Photo link on the main window and you’ll be presented with the upload form:
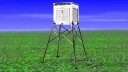
Use the “Browse” button to locate the pictures and completed site survey form in the folder on your computer hard drive. IMPORTANT: Be sure to choose the “overall” picture as the first upload, it will become the thumbnail for the station album. ALSO: Choose the sitename_surveyform.pdf as the second upload. This will ensure that the form exist on the first page of the album thumbnails. You can add additional upload forms by clicking on “More Upload Boxes…” but we suggest no more than four at a time, because if your connection is slow, and a large number of pictures and bytes is being transferred, the system may time out, assume there is a communications error and cancel the upload. Do NOT use the “Link” method to link to pictures on websites, because if that website disappears, so will the picture. If you have pictures on websites, save pictures from the website to your local disk, then upload the picture to the surfacestations.org server. The Webcam/live image method is also not recommended for the same reason. “From Local Server” is disabled. Click the “Add Items” button to start the transfer. You’ll see a message when the transfer has been completed. Repeat the process as needed until all photos are uploaded. If you make a mistake in uploading a file, you can overwrite it later. Navigate back to the Album and check it out to make sure you’ve completed all your uploads You are done! Thanks very much for providing this important climatic resource. Print this picture to carry along to show to others when asking for directions to help identify what a weather station may look like.
|
|
| © 2007, 2008, 2009 - surfacestations.org, Anthony Watts, and various contributors - see rules and terms of use |